Pages


Tuesday 31 July 2012

Captcha Skip

0 comments
1. First of all Register an account at Rumola by clicking here. (you’ll get 10 free trials at registration)

2. Install the addon required for your browser.

    For Chrome : Install Rumola
    For Firefox : Install Rumola
    For Safari : Install Rumola


 3.After installing the addon, restart your browser if required. Once the plugin is activated, it will automatically start filling captchas for you.
Read more...

Sunday 29 July 2012

Da Vinci

0 comments


Single Links
Jumbofiles | Uploadorb  | Peejeshare 

Read more...

Saturday 28 July 2012

Facebook Shortcuts

0 comments


New message = Alt+m
Home page = Alt+1
Profile page = Alt + 2
Friends list management = Alt + 3
All the message list = Alt + 4
List of notification = Alt + 5
Account setting page = Alt + 6
Privacy setting page = Alt + 7
Visit Facebook Fan page = Alt + 8
Facebook Policy Page = Alt+ 9


You just need to add shift before all the shortcut key used for Google Chrome.

New message = shift+Alt+m
Home page =  shift+Alt+1
Profile page = shift+Alt + 2
Friends list management =  shift+Alt + 3
All the message list = shift+Alt + 4
List of notification = shift+Alt + 5
Account setting page = shift+Alt + 6
Privacy setting page = shift+Alt + 7
Visit Facebook Fan page = shift+Alt + 8
Facebook Policy Page = shift+Alt+ 9

You must be logged in Facebook and stay in the Facebook tab of your browser to use the shortcuts. Cool! isn't it? Just go to your Facebook account and give a try! I like the "New message" shortcut most.

Read more...

Gmail Recovering

0 comments
 
Gmail

Today in this post I’ll teach you how to recover your hacked Email account. It is a big disaster if someone hacks your email account and takes control of your email account .As your email account may contain the confidential records and data like internet banking user name, password, credit card details and other sensitive data. If your email account has been hacked and you want it again, then this new trick will surely help you out. In this web trick you will find the possible ways and procedures to get back your hacked email account.
For Gmail Account:

If your Gmail account has been hacked then it would be a big disaster for you as your Gmail account may be associated with several services like “Facebook”, “Blogger”, “Analytics”,” Ad words”, “Ad sense”, “Orkut” etc. When you Lose your access to your Gmail account it means you are losing access to all the services associated with it. Now check out the following new trick to recover your Gmail:
Step -1: First of all try to reset your password. It is the easiest method to get back your Gmail account. For performing this trick Google may ask you to answer the “secret question “that you fill in the form during the creation of your Gmail account or may send the password reset details to the secondary email address associated with your hacked account. 


If the first method does not works for you then choose the second trick given below: 
Step-2: Sometime when the hacker hacks your account they recently change yoursecret question and secondary email address. And your first trick will not work as discussed above. If this is the case then you need to contact the Gmail support team by filling out the account recovery form. The recovery form consists of various question and you have to answer each question accuratly so that your account get recover easily. The various type of question in the form are:
1. Last five emailed addresses on which you send email.
2. Other services associated with your Hacked account
3. Last successful Login  date.
4. Account creation date.
5. Last password that you remember and many more questions…
You need to fill out this form as much accurately as possible. It is obvious to forget the dates of last login, account creation and similar terms. However you need to figure out the closest possible date/answers and fill out this form. This is your last chance to recover your account! The more accurate the information filled out in the recovery form, the more the chances of getting your account back.

Read more...

Protection On Your FB

0 comments


Each one of us, Facebookers, have heard once or many times that one of our friend’s account has been hacked into. Not only is it troublesome to your friends but can also get annoying for the associated people as the hacker attains access to their information as well

1. Enable https:

If you bookmark any social network like Facebook, use HTTPS not HTTP for the URL as it will encode your communication instead of
giving a straight access to any intruder.
You will know that the extent of the security is increased when for any new application; you will have to disable this setting first.
Log into your Facebook account > Choose “Account Settings” from the “Account” menu> Select “Account Security” and select “change”> Ensure there is a tick next to the “Browse Facebook on a secure connection (https) whenever possible” option > Click “Save”.

2. Online Chat:

The online chat feature isn’t as safe as you think it is. I have no technical proof for mentioning this but using online chat has often led to fake comments to my friends supposedly made by me. Obviously, I never made those comments.
Additionally, scams on Facebook have also been seen by many of us. This might also lead to using the online chat service. Hence, keep your chat offline when not needed.
Disable the chat service by clicking the gear-like button on the right-side of the chat window and going offline from there. You can then close the chat window. You will see “offline” written on the chat tab.

3. Control Permissions Granted to Third Party Apps:

Once you give access of your profile to an app on Facebook, the app is allowed to access your profile whether or not you continue using that application. By going to this link (review your Facebook app permissions ) you may restrict the app from further accessing your profile in the future. The extended list of granted permissions still using your profile may come as a shock to you!

4. Text Message Notifications:

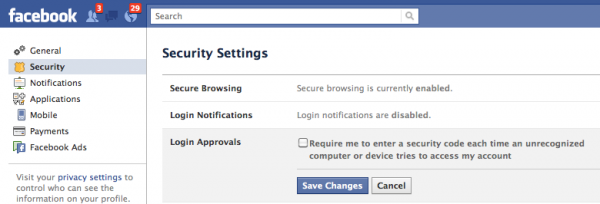
You can be notified when your account is signed in from a device which not the computer you use or your own mobile phone. Facebook sends you a text message for each such login if is activated in your settings.
To get this service, go to Account Settings and under Security Settings you can manage this setting.
Under Security Settings, go to login approvals followed by login notifications.

You can either select email or text notifications and you will get instantly informed. This will also approve your primary computer and your mobile phone as supported access points.

5. Maintain public and private email addresses:

The given email used to set up a Facebook account should be a different one from the ones used for more sensitive purposes such as a Paypal account.
No matter how annoying, a hacked Facebook email will not be as detrimental as a hacked Paypal account. That could cost you monetarily!
The chances of getting hacked are greatly diminished by a practice of carefully using different email addresses for public and private scenarios and changing the passwords regularly.
Due to its being a public forum, Facebook can be searched for any email address as they are non-redundant to pinpoint a specific person you’re looking for. This may have its uses for a friend trying to find you but similarly may be used by hackers for malicious purposes.
The better option is to use different strong (alphanumeric) passwords for a set of varying emails. There are numerous other ways to secure your online activities but the mentioned 5 techniques are the most basic and essential. Specifically used on Facebook as it is the largest online forum and thus the most threat prone.

6. If it looks suspicious, it’s probably is

If you don’t like the look of a post, link or App, do not click on in it. Obvious right? Yet people continue to fall into the trap. Most malicious links or Apps will offer you something too good to be true or use statements like “Shocking”, “Embarrassing”, “Unbelievable” or “Check This Out” in an attempt to draw users in to clicking through.  If you are in any doubt as to the nature of any posts from a “Friend” do not click on it, there is no point risking being hacked for a cheap thrill.

6. Beware the “Smart Phone”


It is becoming increasingly more popular for Facebook users to access their accounts via their mobile phones, with many mobile phone service providers even offering free access to Facebook as part of their service. Although smart phones and free access makes it easier for users to check their Facebook accounts it may also be making it easier for hackers to hack their accounts. In many countries, the network signal provided by service providers is not encrypted, so hackers have the ability to access the data that flows between the mobile and mobile operator with relative ease. They can gain access to all of the information that the user is sending out and is receiving.
My tip is to always check to see if you service provider offers an encrypted network signal
Read more...

Sunday 22 July 2012

Working with Microsoft Office 365: Running Your Small Business in the Cloud by Brett Hill

0 comments

Details of Book: Working with Microsoft Office 365: Running Your Small Business in the Cloud
Book: Working with Microsoft Office 365: Running Your Small Business in the Cloud
Author: Brett Hill
ISBN: 0735658994
ISBN-13: 9780735658998,978-0735658998
Publishing Date: 2012/05/18
Publisher: Microsoft Press

Description:
Dive in—and deploy, manage, and support Microsoft Office 365 for small businesses, regardless of your level of IT knowledge and experience. This guide is packed with extensive walkthroughs, easy-to-follow procedures, handy hints, and real-world troubleshooting tips to help you get up and running with Office 365 cloud services as quickly and efficiently as possible. It’s ideal for small business owners and managers as well as IT professionals.

Discover how to:
  • Implement the Office 365 solutions that best fit your business scenario
  • Configure and maintain your Office 365 services
  • Set up your mobile phones and create a company website
  • Work with Microsoft Exchange Online for email and scheduling
  • Use Microsoft SharePoint® Online to share files and create team sites
  • Manage Microsoft Lync™ Online for instant messaging and online meetings


Download Links:
Read more...

Saturday 21 July 2012

Headache Relief Fast

0 comments


Your headache relief regimen starts with finding the root cause for your pain. Is it improper posture? Improper posture is a very common cause of headaches because it makes the back muscles stiff and constricted, preventing blood from circulating properly to your head and neck and decreasing oxygen supply. Correcting improper posture is one way to achieve headache relief. Practice correct breathing by taking deep inhalations and exhalations. When working on your computer, avoid slouching and lean back as much as possible. Elevate your feet and massage your neck and shoulders every now and then. Occasional shrugs of the shoulders and a roll of the neck relaxes tense muscles. A little goes a long way in this case and headache relief is just a few movements away.

SENSORY INPUT OVERLOAD

An overload of sensory input involving the eyes and ears can also produce headache. Even if you try to ignore all the sights and sounds around you, your brain involuntarily processes them. It is a function which the brain has no control over, so everything that stirs your five senses is automatically sorted out. But its processing capacity is limited and too much data to evaluate will cause it to resist, producing pain.
Headache relief is obtained by turning down the volume of background music. If this is not possible, consider wearing ear plugs to keep out loud or unwanted sound. Some scents can also be overpowering. It could be the cologne or body spray of an officemate or someone you ride with in the lift. A fan near you to disperse the smell can provide headache relief. The glare from overhead lights or the computer screen can also cause headaches. Try dimming a few lights and put a glare guard on the screen. Knowing these information can help bring headache relief.

RELAXATION TECHNIQUES FOR HEADACHE SUFFERERS

Joining in yoga or meditation programs can relive you of tension and is an effective headache relief. If the spiritual aspect is not your thing, you don’t have to engage in it. Yoga is an excellent method of stretching the body and regulating one’s breathing. This will loosen stiff and tense muscles and thus give you headache relief. Enrolling in meditation will show you the power of reflection and positive thinking. Pleasant memories from the past or making plans for the future can distract you from present concerns and rest your mind. Building a protective wall around yourself by turning your thoughts inward to something positive can help you with emotional problems. Through meditation you are given a huge headache relief. It won’t hurt to try out these tips and see if they are effective. It’s almost guaranteed that they will liberate you from headaches.
Article Source: http://www.articlesbase.com/diseases-and-conditions-articles/some-quick-tips-for-headache-relief-910198.html
About the Author
Read more...

Sleep Well Without Pills

0 comments

Author:  alice


 The following tips may help you to sleep well.


The most important point for a good sleep is to avoid caffeine or some strenuous activities, such as keeping too intense exercise constantly for many hours before bedtime because exercise can get the blood pumping which will make you hard to sleep.
Do not take naps in daytime as possible as you can . Without taking naps you will feel tired at that time when bed time rolls around.
To follow your sleeping schedule you set. You can change your sleeping hours and the duration by the natural sleep rhythm of your body. You can impossibly keep always the same rhythm in your life. So this is something necessary you need to do.
To have a cup of 'Sleepytime' tea or warm milk surely is helpful for your sleep. 'Sleepytime' could be herbal tea or some healthy tea with light flavor. But please do not drink tea and milk at the same time before sleep. That is bad for your stomach .When heated, milk produces compounds that have been proven to help insomnia sufferers nod off.
Try to keep your bedroom outside of noise and lights. It is worthy to invest thicker curtains and a 'white noise' machine for you. Sometimes maybe you can not realize it but outside noises and lights really can cause your insomnia.
Be sure the temperature your body like most and adjust the temperature in your bedroom accordingly. People with different body conditions like different temperatures when trying asleep. I can not fall asleep when it is too hot. But my girlfriend, on the other hand, prefers to sleep in a sweat lodge. We compromise on a bedroom temperature that is mutually uncomfortable.
Diet and nutrition decide the quality of your sleep indirectly. You need more food with light flavor instead of strong flavor especially when you are going to sleep at night. Too much food before bedtime will make your stomach and heart have more burden. So that is why people need less food at supper in one day.
Article Source: http://www.articlesbase.com/sleep-articles/how-to-sleep-well-without-pills-1163806.html
Read more...

Heart Attact Prevention Methods

0 comments
In this article today I'd like to talk about several different prevention secrets that should help lower your risk for heart attack in many cases and circumstances. Talk to your doctor before engaging in any of these tips.

The first thing you need to do is lower your cholesterol. Some people need to use cholesterol-lowering statin drugs such as Lipitor but some people choose to go a more natural route. Be sure to consult your doctor to determine the best way for your specific circumstances. 

Cholesterol in our bodies comes from things like eggs and meat and whole milk and other animal food sources but most of the cholesterol in our bodies is produced by our own bodies. Dietary fat is a key ingredient in this equation because the more that you consume the more cholesterol your body will make; so try to cut out dietary fat if at all possible.

A good target to have is 20%. Try to get no more than 20% of your total calories in a given day from fats. To do this the only thing you can do is eliminate fatty foods from your diet. Here are some tips...

Switch from oil-based salad dressings to mustard or balsamic vinegar-based ones. Try to cut out butter, margarine, and mayonnaise as well. Try to replace them with things like jam or roasted garlic. Red meat is bad as well so try to substitute white meat instead or give up meat completely if you can. Finally try to cut down on whole or low-fat milk and cheeses as well as commercially baked foods.

Finally, another great way to prevent heart attacks is to simply reduce the amount of stress in your life. Stress releases adrenaline and adrenaline like chemicals which will always raise your blood pressure which in turn will make your heart beat faster. Your heart doesn't need this extra workload and it can increase your risk for heart attack over the long run.

Reducing stress in your life is easier said than done but one simple technique that I like to use is to engage in a deep breathing routine of 10 deep breaths followed by 10 shallow breaths followed by 10 more deep breaths. I do this several times throughout the day whenever I feel myself becoming stressed out. It only takes a few minutes and can work wonders on your stress levels.

So there you have several simple heart attack prevention secrets that just about anybody can employ without a whole lot of effort or stress. You don't have to engage in all of these tips but adding as many as possible is certainly beneficial in the long run.
Article Source: http://www.articlesbase.com/wellness-articles/heart-attack-prevention-secrets-1967720.html
About the Author
J.P. Morton runs a vacuum cleaner store web site where he also reviews the best bissell vacuum cleaner for your home. He has been an article writer online for well over 10 years and also enjoys rock climbing and white water rafting.
Read more...

Thursday 19 July 2012

STeps For Fake Status

0 comments

Today I am posting one more Amazing facebook Status Trick which was in my mind from a long time but never got a Chance to post it with the help of this trick  you can shock your Facebook Friends.


This Trick Let’s You to Create a Fake Facebook Status By using Facebook Application.You can Take a Snapshot of that Status and can post to your facebook page or Profile.


Simple Steps to Follow :


Step 1 – First Go to The Facebook Application Wall Machine and Click on Connect.


Step 2 – Now you can edit Name,Status,Comments,Like and Pictures as you want.


Step 3 – Click on the Name To Edit Name and Click on Status For Editing Status.


Step 4 – For Adding Picture Click on Left Side of the Name.


Step 5 – Click on Like and Rename it and For Editing Comments click on it and Edit the Comments.
Now You Have Created a Fake Facebook status to take snapshot of this Press ctrl+prnt scrn on your keyboard and paste it on Paint


Step 6 – Now Save your Status By Using Save Button.


You can Also edit the relation ship status Recent activities and Events on a Fake Facebook status.It also provide the name of your friends and photos of them so that you can create a funny facebook status or anything Interesting Snapshot of your Friend's Relationship status,recent activity,Likes.


Enjoy the Trick but please Don't be Mean to your Friends ;)
Read more...

Instructions How to Set Up a Personal PayPal Account :

0 comments


Go to the PayPal website (https://www.paypal.com)
Click on the 'Sign Up' button. The 'Sign Up' link is located at the bottom of the 'Account Login' box.
Select a country and language.
Select your desired account type. The different account types have different fees attached to them. Click on 'Get Started' underneath the type of account chosen.
Enter your contact information (name, address, email, etc). Use your current email address so forgotten passwords can be retrieved.
Choose your password. Password must be at least 9 characters long. Save this information in a secure location.
Agree to the User Agreement and Privacy Policy. PayPal will automatically send you a confirmation email once you click 'I Agree, Create My Account'
Open your email from PayPal and click on 'Activate,' this will activate your account and open your PayPal account in a new window.
For any Further Details Go through the Official Site of Paypal.
Watch This Intro For All How to Questions Related to Paypal.How to verify and Connect your Banki Account to your Paypal Account.
Also see : 9 ways How Payza is Better than Paypal


Note :Don't fall for Phishing Emails!


Phishing is very prevelant. This is when scammers try to lure you into logging into your PayPal account through an email sent to you directly, most often with "PayPal" being somewhere in the sender's email address or name. The message will often lead you to believe that your account has been compromised, that you need to enter your log in details as a security precaution, or something similar.


The page will even have the official PayPal logo and look very official.Simply do not respond to these emails and NEVER log into your PayPal account (or eBay account for that matter) through an email! You can either delete these emails or report them to PayPal. The best way to avoid a phishing scam is to not respond to any PayPal email. Log into your own account directly by typing Paypal dot com into your browser if you have any doubts!
Read more...

Wednesday 18 July 2012

UTV

0 comments
Read more...

Star Gold

0 comments
Read more...

V

0 comments
Read more...

V

0 comments
Read more...

NDTV

0 comments
Read more...

Discovery Hindi

0 comments
Read more...

WWE

0 comments
Read more...

Image Tag

0 comments


What is image Tag?

A Tag is simple HTML code that tells search robots what the image is all about. It is the description of image. This Tag is different from the tags that you add to [a href="http://www.mybloggertricks.com/2011/12/facebook-timeline-cover-create-hot.html" target="_blank"]photos in Facebook[/a]. Here you must be selective with your choice of rich keywords. Following is an example of a simple image HTML Code:
<img src="IMAGE LINK" />
Adding this code any where in your templates will display an image. When robots scan your content they look for every detail and when they come across you image HTML code they do not recognize what the image is all about. It can't judge if it is an image on SEO Tips or Pizza Recipe. To let robots index each of your images you must add an alt Tag  This alt Tag was introduced by Google so that images could be well described, categorized and indexed. This Tag tells the robot about the purpose of the image. For Example:
<img src="IMAGE LINK" alt="SEO Tips" />
You can see in the above code that the yellow highlighted part tells Search engine spiders that the image being displayed is about "SEO Tips" You just need to add two-three short words to describe your image. Thus alt tag is basically a short HTML code i.e. alt="" and you add the description of image between the inverted commas.

What are Optimized Image Tags?

Just by adding a alt tag to your image code wont turn your image into an optimized one. You should keep the following tips in mind while writing description for your pictures, photos or any image:
  1. Keep Description limited to 4 words. Less is best
  2. Don't write full sentences to describe images. Instead of writing "Best SEO Tips to Optimize Images in Blogspot" Simply Tag it as "Image SEO Tips" or "Optimized Images" or "How To Optimize Images"
  3. Just like not every keyword should be added to [a href="http://www.mybloggertricks.com/2011/01/how-to-write-search-engine-friendly.html" target="_blank"]Post titles[/a], similarly not every keyword should be added to Image Tags. Brief, Precise and relevant tagged images always score high. Keep it simple as much as possible. Google is smart enough to attach related keywords to your image from your post content.
  4. Always Add an intro image to your posts. I always add an intro image at the start of every post and I tag it sensibly so that the image Tag may clearly synchronize with the [a href="http://www.mybloggertricks.com/2011/06/optimize-blog-post-titles-using-h2-tag.html" target="_blank"]post title[/a]. Use your best keywords in your intro images
  5. Do not tag images with senseless words. If the image is a screenshot of an installation process step for instance Photoshop. Then instead of writing as "Click settings" or "Click Next" give it a rich tag like "Photoshop Settings" or "Best Photoshop settings"
  6. Tag the image with normal English words and avoid use of special characters like %, $, #, @,&, -, _ etc.

How to add alt Tags To Blogger Images?

Whenever you add a photo to your post editor, always switch to "Edit HTML" mode and find the HTML code for the image which will look like this:
<a href="http://lh3.ggpht.com/-s4duV3rFdNU/TraScxE5PoI/AAAAAAAAFVo/ZkfRcPAVpkI/image%25255B30%25255D.png?imgmax=800" ><img src="http://lh3.ggpht.com/-s4duV3rFdNU/TraScxE5PoI/AAAAAAAAFVo/ZkfRcPAVpkI/image%25255B30%25255D.png?imgmax=800" /></a>

I know it looks weird but you just need to identify the HTML code of the image which is the highlighted portion. Add the alt tag just after <img as shown below,
<a href="http://lh3.ggpht.com/-s4duV3rFdNU/TraScxE5PoI/AAAAAAAAFVo/ZkfRcPAVpkI/image%25255B30%25255D.png?imgmax=800" ><img alt="IMAGE DESCRIPTION" src="http://lh3.ggpht.com/-s4duV3rFdNU/TraScxE5PoI/AAAAAAAAFVo/ZkfRcPAVpkI/image%25255B30%25255D.png?imgmax=800" /></a>

This way you will turn your images into a traffic driving source and can expect fair amount of increase in daily visitors just by adopting the habit of Image Tagging.

Need Help?

If you have any questions in mind related to image optimization then feel free to post your comments. I hope this small tutorial may help you in improving your blogging skills. Peace and blessings pals! :)
Source: http://www.mybloggertricks.com/2011/12/how-to-tag-images-in-blogger-to-drive.htm
Read more...

Mashable

0 comments

Its been a Long time Since I posted About the Blogging and Widgets.Now days I am at Home and Getting Bored with Facebook and It is Also Killing my Creativity.During Exam I posted so Many articles Related to Blogging Tips and Tricks,Tools and widgets for Blogger.One of the Famous Widget is Mashable sharing widgets Initially it was seen only on Mashable. later on One of the Bloggers (Mohammad, a certified SEO Consultant, Pro Blogger, Computer Engineer and an addicted Web Developer) and Owner of Mybloggertricks.com Posted about the Mashable sharing widget and the Code of widget is Available for free on His Website.

I also grabbed the simple Code from the site and Implemented with the help of Step by step Guide provided by Mybloggertricks.I am one of the Huge fans of the Myblogger Tricks and will suggest any newbie or a pro blogger to follow this Site for Blogging widgets and Blogging Tips.

You can see the Example of Mashable Sharing Widget Version 2.0 on my Blog Placed at right side.For having Similar Widget on Your Site Just Follow this Link Mashable Sharing Widget For Blogger and Follow
the Steps Given there.Copy the Code and Paste it in your Template (After Creating a Back up) and Replace the Few links with your Facebook Fanpage,Twitter Handler,RSS feed and Feedburner URL.

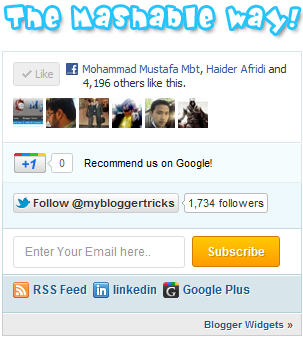
Preview Image of the Sharing Widget Version 1
mashable sharing widget
Image Credits : Mybloggertricks.com
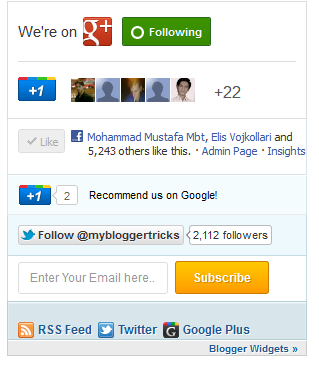
This was the First Version of the Mashable Sharing Widget Which was First Published on the Mybloggertricks Website as far as my point of View.After the Google's +1 Badge and Pages Inclusion Mashable Sharing Widget second Version was launched by Same site.It Includes the Follow on Google+ and +1 Button for Google Page so your Readers Easily can Appreciate your Work by +1d your post as well as you Google page and can Also Follow your Google page. 
You can Get this Widget simply By Clicking this Link Mshable Sharing Widget For Blogger - Version2 and Easily can Add it to your Blog/Website

Image preview of the Sharing Widget Version 2
mashable sharing widget for blogger
Image Credits: Mybloggertricks.com
I'll Personally Suggest you to use second Version of the MBT's Mashable sharing Widgets as It Includes all the Social media Sharing Tools.For those who want it Compact Can use First Version of the Widget as it takes 40px less Height than Second Version.

All Depends on your Choice.In next post I'll be Reviewing Few more Widgets From MBT's Lab as I am a Huge Fan of Coding skills of Mohammad and Widgets of MBT.
Till then
 
Read more...

Wifi Know

0 comments

Just Follow the procedure below to know who is using your WiFi network

  •  Open Cmd.(i.e Command Prompt of windows)
  •  Type "net view"
  •  Firstly you will see your laptop or computer name, then rest of the computer which are using your Wifi network
  • This way you can figure out who is using your Wifi network with or without permission 
Read more...

Shortcuts

0 comments


ShortcutKeyDefinitionAction
cCompose Allows You to compose a new message. <Shift> + c allows you to compose a message in a new window.
/SearchPuts your cursor in the search box.
kMove to newer conversationOpens or moves your cursor to a more recent conversation. You can hit<Enter> to expand a conversation.
jMove to older conversationOpens or moves your cursor to the next oldest conversation. You can hit<Enter> to expand a conversation.
nNext messageMoves your cursor to the next message. You can hit <Enter> to expand or collapse a message. (Only applicable in 'Conversation View.')
pPrevious messageMoves your cursor to the previous message. You can hit <Enter> to expand or collapse a message. (Only applicable in 'Conversation View.')
o or <Enter>OpenOpens your conversation. Also expands or collapses a message if you are in 'Conversation View.'
uReturn to conversation listRefreshes your page and returns you to the inbox, or list of conversations.
eArchiveArchive your conversation from any view.
mMuteArchives the conversation, and all future messages skip the Inbox unless sent or cc'd directly to you.
xSelect conversationAutomatically checks and selects a conversation so that you can archive, apply a label, or choose an action from the drop-down menu to apply to that conversation.
sStar a message or conversationAdds or removes a star to a message or conversation. Stars allow you to give a message or conversation a special status.
+Mark as importantHelps Gmail learn what's important to you by marking misclassifiedmessages. (Specific to Priority Inbox)
-Mark as unimportantHelps Gmail learn what's not important to you by marking misclassified messages. (Specific to Priority Inbox)
!Report spamMarks a message as spam and removes it from your conversation list.
rReplyReplies to the message sender.<Shift> + r allows you to reply to a message in a new window. (Only applicable in 'Conversation View.')
aReply allReplies to all message recipients.<Shift> +a allows you to reply to all message recipients in a new window. (Only applicable in 'Conversation View.')
fForwardForwards a message. <Shift> + fallows you to forward a message in a new window. (Only applicable in 'Conversation View.')
<Esc>Escape from input fieldRemoves the cursor from your current input field.
<Ctrl> + sSave draftSaves the current text as a draft when composing a message. Hold the<Ctrl> key while pressing s and make sure your cursor is in one of the text fields -- either the composition pane, or any of the To, CC, BCC, or Subject fields -- when using this shortcut.
#DeleteMoves the conversation to Trash.
lLabelOpens the Labels menu to label a conversation.
vMove toMoves the conversation from the inbox to a different label, Spam or Trash.
<Shift> + iMark as readMarks your message as 'read' and skip to the next message.
<Shift> + uMark as unreadMarks your message as 'unread' so you can go back to it later.
[Archive and previousRemoves the current view's label from your conversation and moves to the previous one.
]Archive and nextRemoves the current view's label from your conversation and moves to the next one.
zUndoUndoes your previous action, if possible (works for actions with an 'undo' link).
<Shift> + nUpdate current conversationUpdates your current conversation when there are new messages.
qMove cursor to chat searchMoves your cursor directly to the chat search box.
yRemove from Current View*Automatically removes the message or conversation from your current view.
  • From 'Inbox,' 'y' meansArchive
  • From 'Starred,' 'y' meansUnstar
  • From 'Trash,' 'y' meansMove to inbox
  • From any label, 'y' meansRemove the label
* 'y' has no effect if you're in 'Spam,' 'Sent,' or 'All Mail.'
.Show more actionsDisplays the 'More Actions' drop-down menu.
<Ctrl> + <Downarrow>Opens options in Chat
  • <Ctrl> + <Down arrow> moves from edit field in your chat window to select the 'Video and more' menu
  • Next, press <Tab> to select the emoticon menu
  • Press <Enter> to open theselected menu
?Show keyboard shortcuts helpDisplays the keyboard shortcuts help menu within any page you're on. (Note: Typing ? will display the helpmenu even if you don't have keyboard shortcuts enabled)
kMove up a contactMoves your cursor up in your contact list
jMove down a contactMoves your cursor down in your contact list
o or <Enter>OpenOpens the contact with the cursor next to it.
uReturn to contact list viewRefreshes your page and returns you to the contact list.
eRemove from Current GroupRemoves selected contacts from the group currently being displayed.
xSelect contactChecks and selects a contact so that you can change group membership or choose an action from the drop-down menu to apply to the contact.
<Esc>Escape from input fieldRemoves the cursor from the current input
#DeleteDeletes a contact permanently
lGroup membershipOpens the groups button to group contacts
zUndoReverses your previous action, if possible (works for actions with an 'undo' link)
.Show more actionsOpens the "More actions" drop-down menu.

Combo-keys - Use the following combinations of keys to navigate through Gmail. 

ShortcutKeyDefinitionAction
<Tab> then <Enter>Send messageAfter composing your message, use this combination to send it automatically. (Supported in InternetExplorer and Firefox, on Windows.)
y then oArchive and nextArchives your conversation and moves to the next one.
g then aGo to 'All Mail'Takes you to 'All Mail,' the storage site for all mail you've ever sent or received (and have not deleted).
g then sGo to 'Starred'Takes you to all conversations you have starred.
g then cGo to 'Contacts'Takes you to your Contacts list.
g then dGo to 'Drafts'Takes you to all drafts you have saved.
g then lGo to 'Label'Takes you to the search box with the "label:" operator filled in for you.
g then iGo to 'Inbox'Returns you to the inbox.
g then tGo to 'Sent Mail'Takes you to all mail you've sent.
* then aSelect allSelects all mail.
* then nSelect noneDeselects all mail.
* then rSelect readSelects all mail you've read.
* then uSelect unreadSelects all unread mail.
* then sSelect starredSelects all starred mail.
* then tSelect unstarredSelects all unstarred mail.


SHARE IF YOU LIKE!!!
Read more...